
Hardwood flooring brings enduring grace and a cozy ambiance to any room. While many opt for modern installation methods, nailing hardwood flooring by hand remains a cherished craft. It’s an art that requires precision, patience, and dedication. In this comprehensive guide, we’ll walk you through every step of the process, from selecting the right materials to adding the finishing touches. Whether you’re a seasoned DIY enthusiast or a novice looking to embark on your first hardwood flooring project, this guide has you covered.
How to Nail Hardwood Flooring by Hand
Choosing the Right Hardwood
Before you start nailing, it’s crucial to select the right hardwood for your project. Factors to consider include wood type, grade, and finish. Oak, maple, and cherry are popular choices due to their durability and aesthetics. Additionally, the grade determines the wood’s appearance, with clear grades having fewer imperfections. Lastly, choose between finished and unfinished hardwood, depending on your preference for customization.
Preparing the Subfloor
A solid foundation is essential for a successful hardwood flooring project. Ensure your subfloor is clean, level, and dry. Remove any existing flooring material, nails, or debris. Use a leveling compound if needed, as an uneven subfloor can result in squeaky or uneven hardwood.
Acclimatizing the Hardwood
Wood is sensitive to humidity and temperature changes, so it’s vital to let your hardwood acclimate to the environment. Place the wood in the room where you plan to install it for a minimum of 48 hours. This helps prevent warping and ensures a tight fit.
Laying the Underlayment
Install a moisture barrier underlayment to protect your hardwood from moisture coming up from the subfloor. This barrier is essential for maintaining the integrity of your flooring over time.
Starting the Installation
Begin by laying the first row of hardwood along the longest wall in the room. Leave a 1/2-inch expansion gap along the walls to allow for natural wood expansion. Use a chalk line to maintain a straight alignment. Pre-drill holes for your nails to prevent splitting the wood, and then nail the boards in place. Continue this process, staggering the joints for a visually pleasing pattern.
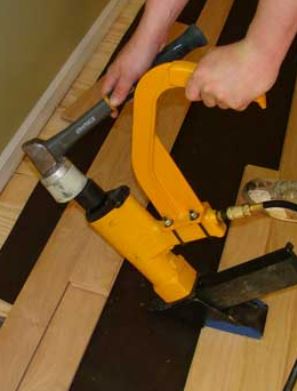
Nailing Techniques
Mastering the nailing technique is the heart of nailing hardwood flooring by hand. Here are some essential tips:
- Use a nail gun designed for hardwood flooring for precise results.
- Angle the nails at 45 degrees to secure the boards effectively.
- Space the nails 6 to 8 inches apart along the boards.
- Ensure the nail heads are slightly below the surface to avoid tripping hazards.
Sanding and Finishing
Once the hardwood is installed, it’s time to refine the surface. Start with rough-grit sandpaper to remove any imperfections and gradually work your way to finer grits. After sanding, apply a finish of your choice—polyurethane for a durable, glossy finish or oil for a more natural look. Allow the finish to dry completely before using the room.
Maintenance and Care
Proper care will extend the life of your hardwood flooring. Regularly clean with a soft broom or vacuum to prevent dirt and debris from scratching the surface. Use a damp mop with a hardwood floor cleaner for deeper cleaning. Avoid excessive moisture, as it can cause warping.
Frequently Asked Questions
How long does it take to acclimate hardwood flooring?
Allow at least 48 hours for hardwood to acclimate to the room’s temperature and humidity.
Can I install hardwood flooring over existing tile?
It’s best to remove existing tile to ensure a level and stable subfloor.
Is it possible to nail hardwood flooring without a nail gun?
While possible, it’s highly recommended to use a nail gun for precision and efficiency.
What’s the ideal humidity level for hardwood flooring?
Maintain a relative humidity level between 30% and 50% to prevent warping and shrinking.
How often should I refinish my hardwood floors?
Refinishing intervals depend on wear and tear. Typically, every 7-10 years is sufficient.
Can I install hardwood flooring in a bathroom?
Hardwood is not recommended for high-moisture areas like bathrooms. Consider alternative flooring options.
Conclusion
Nailing hardwood flooring by hand is a labor of love that rewards you with stunning, enduring results. By following the steps outlined in this guide, you’ll be well on your way to achieving a flawless hardwood floor that adds charm and value to your home. Remember to take your time, pay attention to detail, and enjoy the journey of crafting a beautiful hardwood floor by hand.