
In the realm of construction and woodworking, selecting the right nail size is pivotal for ensuring the strength and longevity of your projects. The nail gauge chart acts as a roadmap, guiding craftsmen and DIY enthusiasts in choosing the appropriate nail size based on their specific needs. Whether you’re constructing a sturdy wooden frame, assembling furniture, or building a structure, this guide will walk you through the intricate details of nail gauge charts, empowering you to make informed decisions for your projects.
Nail Gauge Chart: The Basics Unveiled
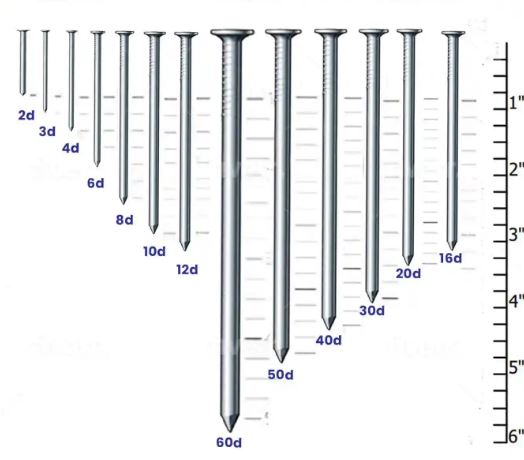
At its core, a nail gauge chart is a visual representation that correlates the diameter of a nail with its gauge number. The gauge number, often referred to as the “penny” size, indicates the nail’s length. Contrary to what you might think, the relationship is inverse—larger gauge numbers represent thinner nails, while smaller gauge numbers signify thicker, longer nails. For instance, a 16-gauge nail is thicker and longer than an 18-gauge nail. This system might seem counterintuitive initially, but once understood, it simplifies nail selection significantly.
Why Nail Gauge Matters: Ensuring Structural Integrity
The nail gauge you choose directly impacts the stability and durability of your construction or woodworking project. Selecting a nail that’s too thin might lead to weak joints and structural failures, compromising the safety of your creation. On the other hand, using a nail that’s too thick can cause splitting and damage to the materials you’re working with. Therefore, grasping the nuances of nail gauge charts is essential for achieving the perfect balance between strength and aesthetics in your projects.
How to Read a Nail Gauge Chart: A Step-by-Step Guide
Understanding a nail gauge chart might seem intimidating initially, but breaking it down into simple steps can demystify the process. Follow these steps to read a nail gauge chart with ease:
- Identify the Gauge Number: Locate the gauge number on the chart. This number represents the “penny” size of the nail.
- Correlate with Length: Understand that as the gauge number increases, the nail diameter decreases. Correspondingly, smaller gauge numbers indicate thicker and longer nails.
- Choose Based on Application: Consider the nature of your project. If you’re working with heavy materials or load-bearing structures, opt for thicker nails. For finer woodworking or delicate surfaces, thinner nails are preferable.
- Check for Compatibility: Ensure that the nail length and diameter you choose are compatible with the materials you’re joining. The nail should penetrate both materials without splitting or causing damage.
Nail Gauge Chart: Practical Applications
The utility of a nail gauge chart extends beyond mere nail selection. It aids in determining the appropriate tools for driving the nails and helps estimate the force required to achieve a secure joint. Furthermore, understanding nail gauge charts enhances your ability to communicate effectively with suppliers and other professionals in the industry, ensuring that you get the right materials for your projects.
Frequently Asked Questions
What is the primary purpose of a nail gauge chart?
The main purpose of a nail gauge chart is to assist craftsmen and builders in selecting the right nail size for their projects. It ensures that the chosen nail provides optimal structural integrity without causing damage to the materials being joined.
Can I use any nail with the same gauge number for my project?
While nails with the same gauge number might have similar diameters, they can vary in terms of length, material, and intended use. It’s essential to consider these factors alongside the gauge number to choose the most suitable nail for your specific application.
Is there a universal nail gauge chart for all types of nails?
Nail gauge charts can differ slightly based on the type of nail and the manufacturer. It’s recommended to refer to the specific gauge chart provided by the nail manufacturer or supplier to ensure accurate nail selection.
What should I do if the nail gauge chart isn’t available?
If a nail gauge chart isn’t readily accessible, you can measure the diameter of the nail and compare it to a standard gauge chart. Remember that the gauge number represents the number of nails of that size that can be made from one pound of steel.
Can nail gauge charts be used for non-wood materials?
While nail gauge charts are primarily designed for woodworking, they can also be applied to other materials like metals and plastics. However, it’s essential to consider the material’s properties and consult industry guidelines for best practices.
Are there any alternatives to nails for joining materials?
Yes, there are alternatives such as screws, dowels, adhesives, and staples. The choice between nails and alternatives depends on factors like the material being used, the level of structural integrity required, and the specific project’s needs.
Conclusion
In the world of construction and woodworking, precision is paramount. The nail gauge chart stands as a valuable tool, offering insights that enable you to make educated decisions about nail selection. By understanding the nuances of nail gauge charts, you’re equipped to create structures that not only stand strong but also showcase impeccable craftsmanship.
Remember, the nail gauge chart is your ally in achieving the delicate balance between aesthetics and functionality. So, whether you’re a seasoned professional or a passionate DIY enthusiast, let the knowledge you’ve gained from this guide empower you to elevate your projects to new heights.